Delphix Storage Migration and Oracle Cloud (OCI) (KBA7909)
KBA
KBA# 7909
Issue
The mechanism to remove one or more storage devices from a Delphix Engine is discussed in product documentation under Delphix Storage Migration:
https://cd.delphix.com/docs/latest/delphix-storage-migration
As part of this process, it is necessary to correlate the disk device in the Delphix Engine System Setup interface, with the allocated Block Volume in Oracle Cloud (OCI) before removing the device from the Engine. However, OCI currently provides no distinct reference to correlate the Block Volume with the Delphix configuration. Many other hypervisor platforms expose metadata for the disk devices (serial number, GUID, SCSI target/LUN ID) that can be used to confirm the association, but this method is not possible in OCI.
Additionally, the device order/mapping in OCI is not guaranteed to be consistent between reboots, so it also cannot be assumed that a 1:1 correlation between disks added and the device identifiers within Delphix are consistent if the Engine has been restarted at any time.
If multiple disk devices of the same size are provisioned to the Delphix Engine (as suggested in the Product Documentation), this ultimately leaves no unique identifier that can be correlated by an Administrator.
This document presents an alternative method to correlate devices by generating artificial I/O using the Storage test tool and viewing Block Volume I/O metrics.
It is strongly recommended that the Block Volume be detached from the Engine, and Engine boot/functionality confirmed before destroying the Block Volume. As the Delphix Engine provides no redundancy or resiliency to loss of an actively configured device, failure to locate and remove the correct disk device can result in an unrecoverable loss of data.
Applicable Delphix Versions
- Click here to view the versions of the Delphix engine to which this article applies
-
Date Release Dec 10, 2023 | Jan 10, 2024 18.0.0.0 | 18.0.0.1 Nov 21, 2023 17.0.0.0 Oct 18, 2023 16.0.0.0 Sep 21, 2023 15.0.0.0 Aug 24, 2023 14.0.0.0 Jul 24, 2023 13.0.0.0 Jun 21, 2023 12.0.0.0 May 25, 2023 11.0.0.0 Apr 13, 2023 10.0.0.0 | 10.0.0.1 Mar 13, 2023 | Mar 20, 2023 9.0.0.0 | 9.0.0.1 Feb 13, 2023 8.0.0.0 Jan 12, 2023 7.0.0.0 Releases Prior to 2023 Major Release All Sub Releases 6.0 6.0.4.0, 6.0.4.1, 6.0.4.2, 6.0.5.0, 6.0.6.0, 6.0.6.1, 6.0.7.0, 6.0.8.0, 6.0.8.1, 6.0.9.0
Resolution
In the absence of any other unique identifiers to associate block volume (BV) with Delphix Engine disk devices, the storage test tool (fio) can be used to artificially generate I/O for an unconfigured disk device. By initiating one or more storage tests and monitoring the I/O activity generated in the OCI instance, the block volume can be confirmed for removal.
Perform Storage Test
First, select the disk device to be removed and proceed with the device removal process as discussed in the Storage Migration process:
https://cd.delphix.com/docs/latest/delphix-storage-migration
Disk2:2 will be used for this exercise.
OCIEngine> storage device
OCIEngine storage device> ls
Objects
NAME     CONFIGURED  SIZE  EXPANDABLESIZE  FRAGMENTATION
Disk2:3  true        50GB  0B              0%
Disk2:2  true        50GB  0B              0%
Disk2:1  true        50GB  0B              0%
Disk2:0  true        70GB  0B              NA

Operations
refreshCache
OCIEngine storage device> select Disk2:2
OCIEngine storage device 'Disk2:2'> remove
OCIEngine storage device 'Disk2:2' remove *> commit
    Dispatched job JOB-1
    STORAGE_DEVICE_START_REMOVAL job started for "Disk2:2".
    STORAGE_DEVICE_START_REMOVAL job for "Disk2:2" completed successfully.


OCIEngine storage device 'Disk2:2'> back
OCIEngine storage device> ls
Objects
NAME     CONFIGURED  SIZE  EXPANDABLESIZE  FRAGMENTATION
Disk2:3  true        50GB  0B              0%
Disk2:2  false       50GB  -               -
Disk2:1  true        50GB  0B              0%
Disk2:0  true        70GB  0B              NA
Once the device removal job has completed, the CONFIGURED flag is indicated as false, confirming it has been successfully removed from the storage pool. The disk is now eligible for selection in the storage test.
In this example, the storage test is configured for READ only; this selection is optional, and WRITE could be used alternatively. The test used ultimately does not matter, but will affect the selected metric to monitor later in this process. The initializeDevices parameter is also set to false so the disk is not initialized prior to the storage test execution.
OCIEngine> /storage test
OCIEngine storage test> create
OCIEngine storage test create *> set devices=Disk2:2
OCIEngine storage test create *> set duration=30
OCIEngine storage test create *> set tests=READ
OCIEngine storage test create *> set initalizeDevices=false
OCIEngine storage test create *> ls
Properties
    type: StorageTestParameters
    devices: Disk2:2 (*)
    duration: 30 (*)
    initializeDevices: false (*)
    initializeEntireDevice: false
    testRegion: 512GB
    tests: READ (*)

OCIEngine storage test create *> commit
    `STORAGE_TEST-1
    Dispatched job JOB-3
    STORAGE_TEST_EXECUTE job started for "system".
    Initializing storage test.
    ETA: 0:03:34.
    Starting storage benchmarking.
    Starting sequential read workload with 64 KB block size and 4 jobs.
    Starting sequential read workload with 64 KB block size and 8 jobs.
Although the duration parameter is configured to 30 minutes, the test will complete much faster than this as only READ is configured; generally this has been observed to complete in 3-5 minutes.
For the purposes of the exercise, we are executing the test described above twice to have a more distinct I/O pattern to correlate with times.
Correlate I/O Metrics - Single Block Volume
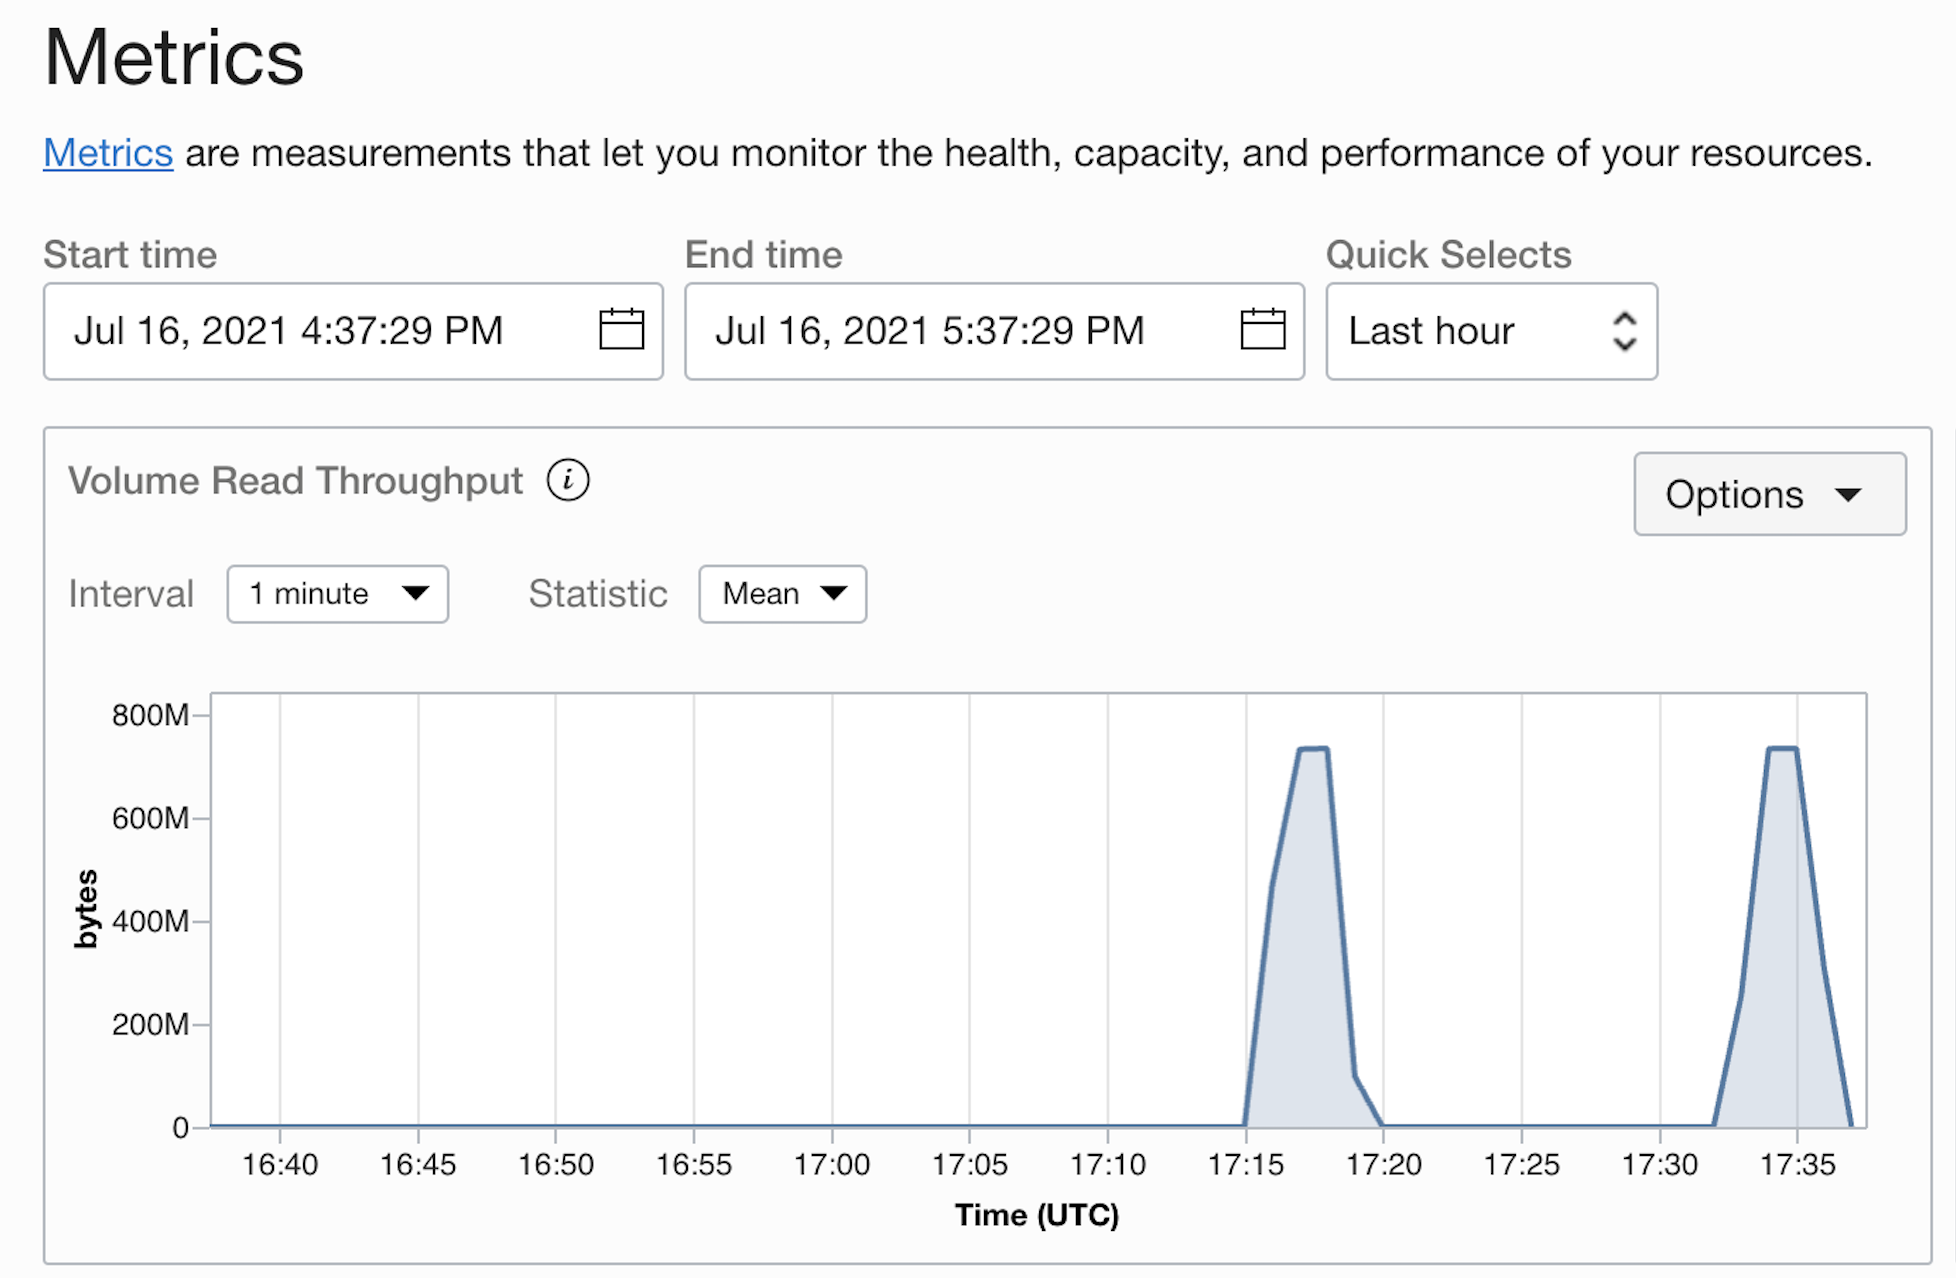
During or after the test, the I/O metrics for the Block Volumes associated with the compute instance can be reviewed individually by navigating to Compute - Instances, and clicking through to each of the associated Block Volumes, then reviewing each Block Volume metrics page (Click the Block Volume name and scroll to bottom).
Once the corresponding I/O pattern of significant read activity for the two ~5-minute periods are located, we can confirm this is the disk device to be removed:
Correlate I/O Metrics - Multiple Block Volumes
For an Engine with a larger number of disk devices, the individual click-through method may be cumbersome, so alternatively the metrics for multiple volumes can be displayed simultaneously by building a query in Metrics Explorer under Observability + Management - Monitoring.
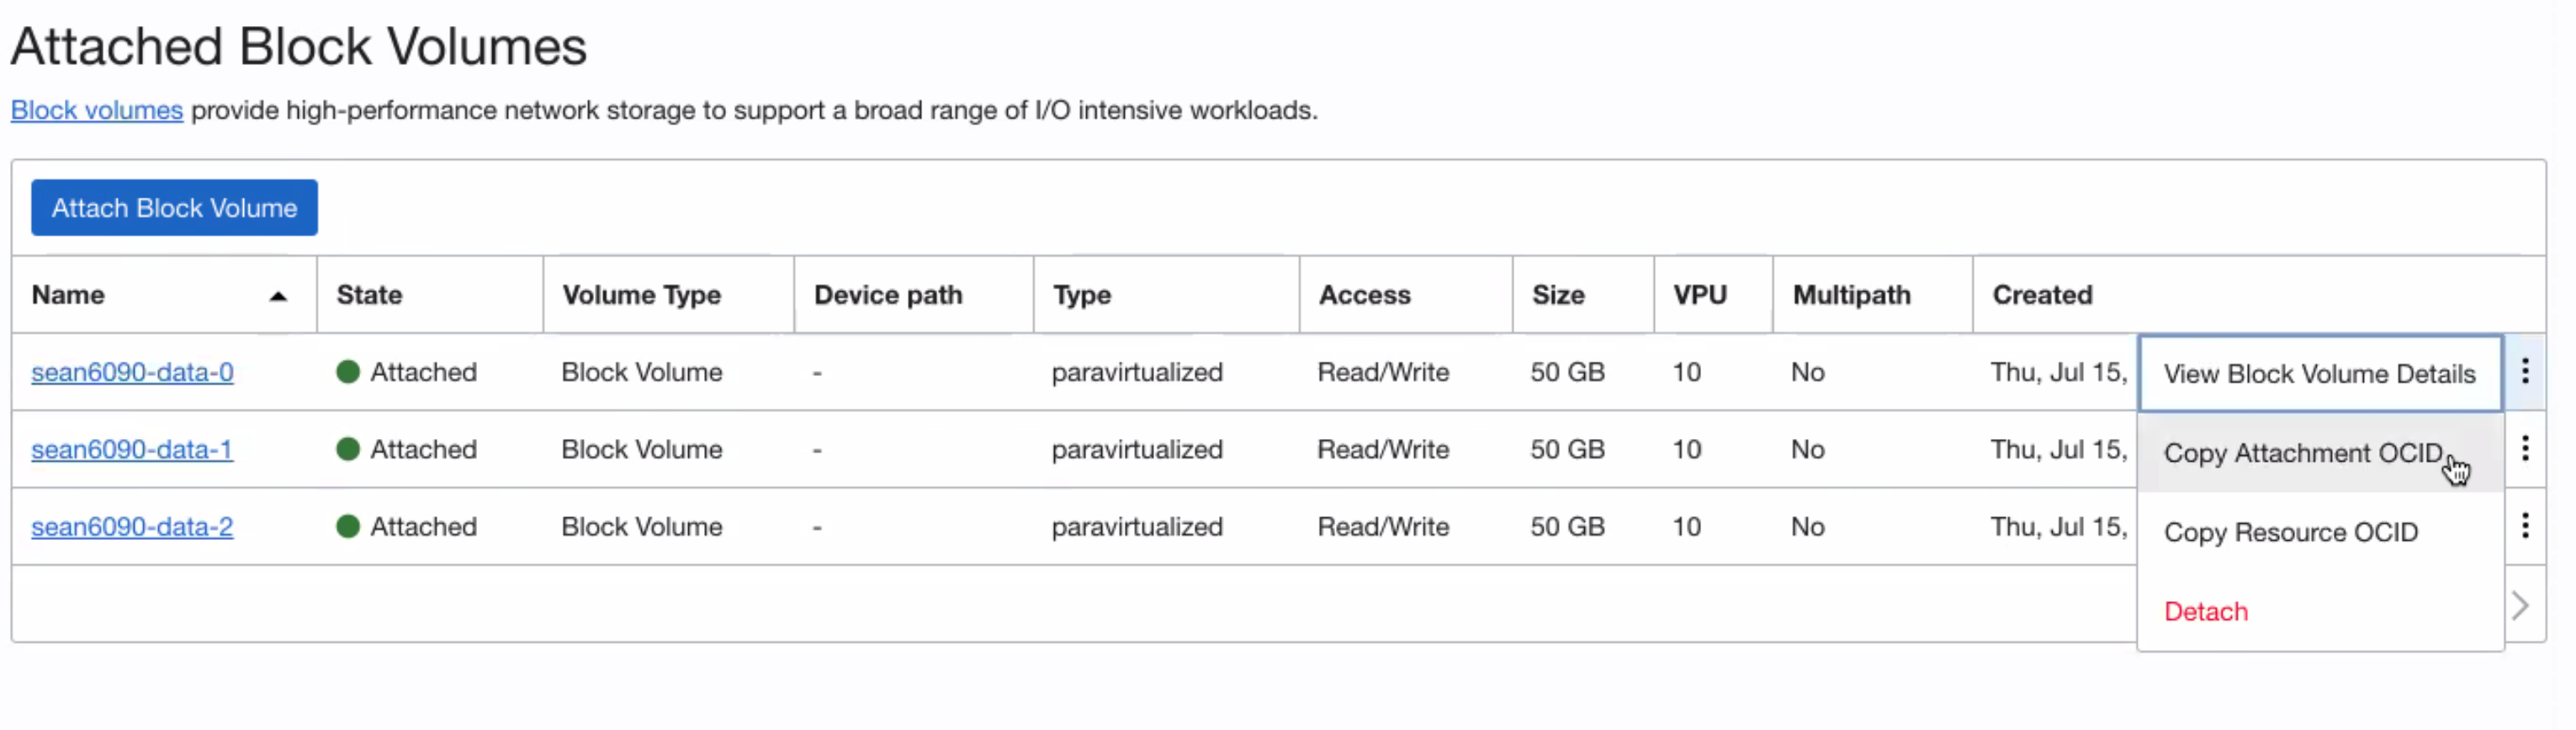
Prior to this, the Attachment ID for each block device needs to be located. This can be obtained in the OCI web interface for the Delphix Engine Compute Instance by clicking the three dot menu on right side of each attached volume, and selecting Copy Attachment OCID:
Alternatively, if OCI CLI is available the volume-attachment list command can be used to capture each attached Block Volume Attachment ID and name:
oci compute volume-attachment list --instance-id <compute instance ID> | grep volumeattachment
Example:
% oci compute volume-attachment list --instance-id ocid1.instance.oc1.phx.anyhqljrvkq43pycnltv4qt4x3quby46vaxef3ewm46roujncf5vv44mh22q --auth security_token --profile test | grep volumeattachment
      "display-name": "volumeattachment20210715212453",
      "id": "ocid1.volumeattachment.oc1.phx.anyhqljrvkq43pycm4c3p33cbcazggvlp6akydhgef6lh3t3apxxclgjjalq",
...
Once all Block Volume Attachment IDs are located, the query can be built. From Metrics Explorer, select the applicable Compartment for the Engine Compute Instance, and select the Metric namespace: "oci_blockstore".
If the storage test was configured as described above for READ only, select the Metric name "VolumeReadOps".
Under Metric Dimensions, set the Dimension name: attachmentId and set the Dimension value to the first Block Volume Attachment OCID obtained in previous steps. All other options can be left with default values (Interval, Statistic). Clicking Update Chart will commit this query.
Then, click Add Query button to create additional queries for each of the attached Block Volumes with the same parameters selected as above for each unique Attachment OCID.
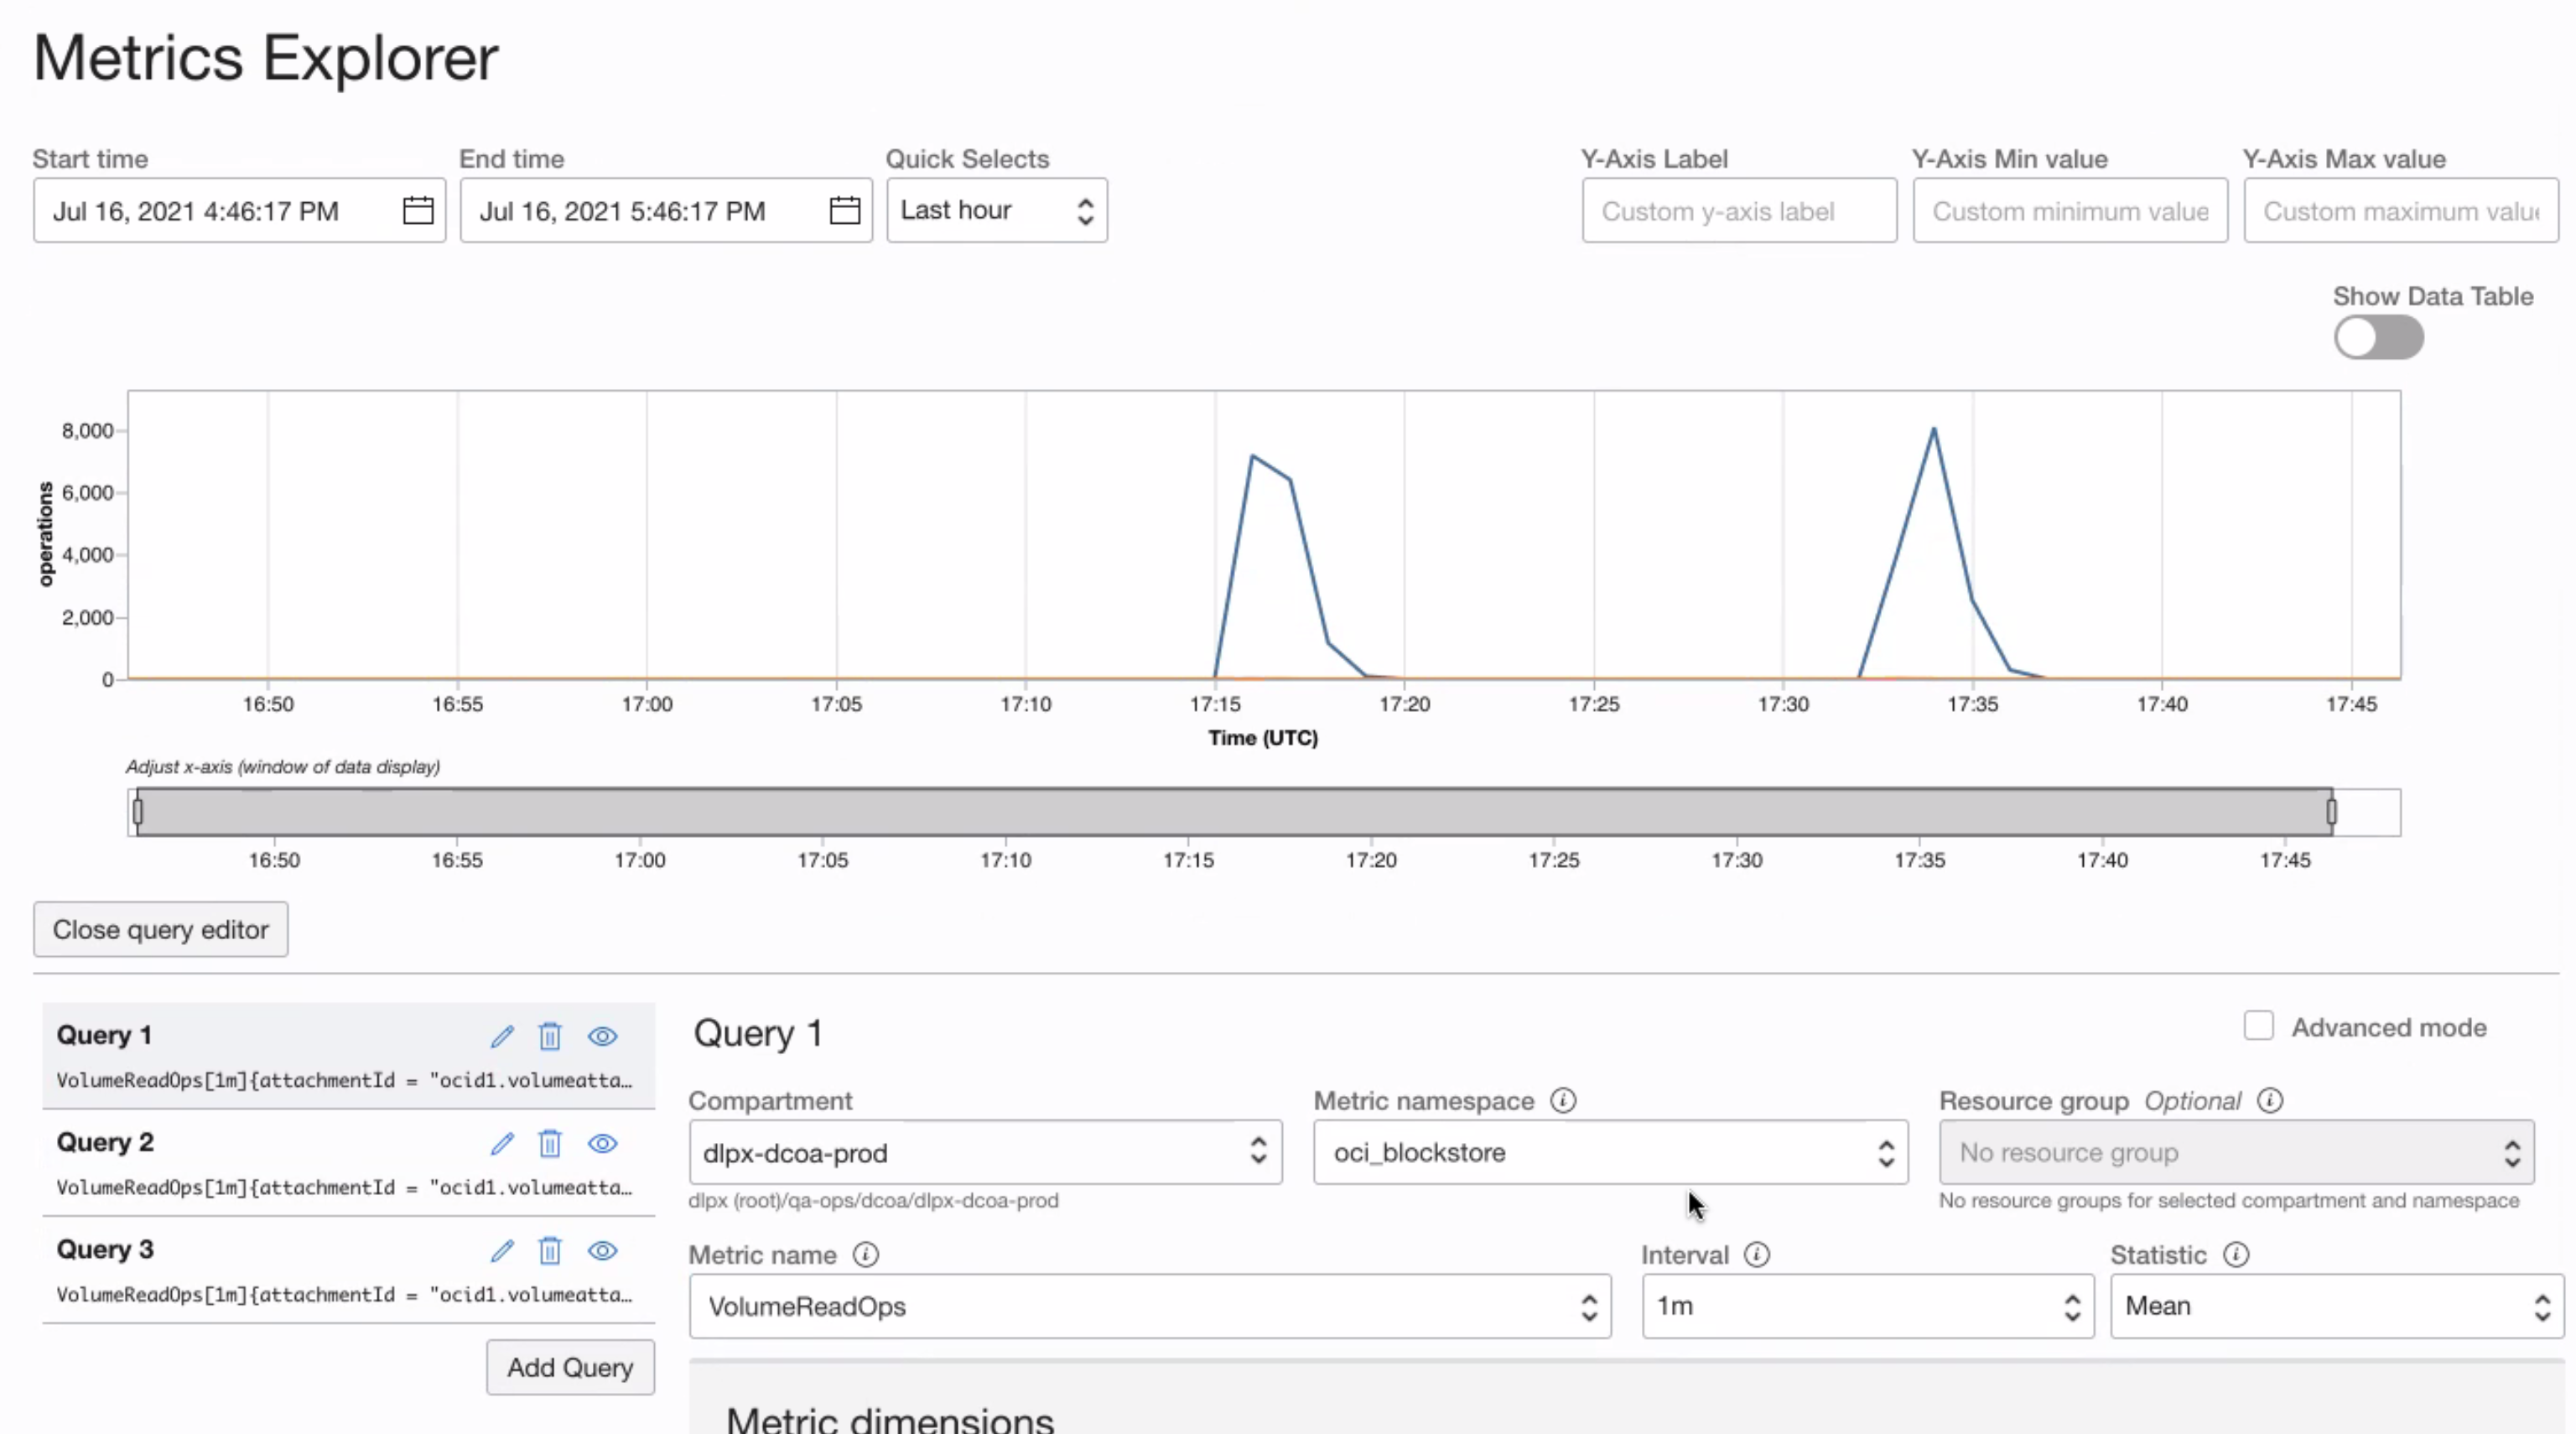
Once all Engine disks are configured in the query, the read I/O activity for all disks attached to the Engine will be represented. Similar to the individual Block Volume graphs, the periods of storage test execution can be located on the timeline.
In the screenshot below, all 3 disk devices from the example Engine have been added using this methodology, so 3 queries are represented on the left-hand side of the interface:
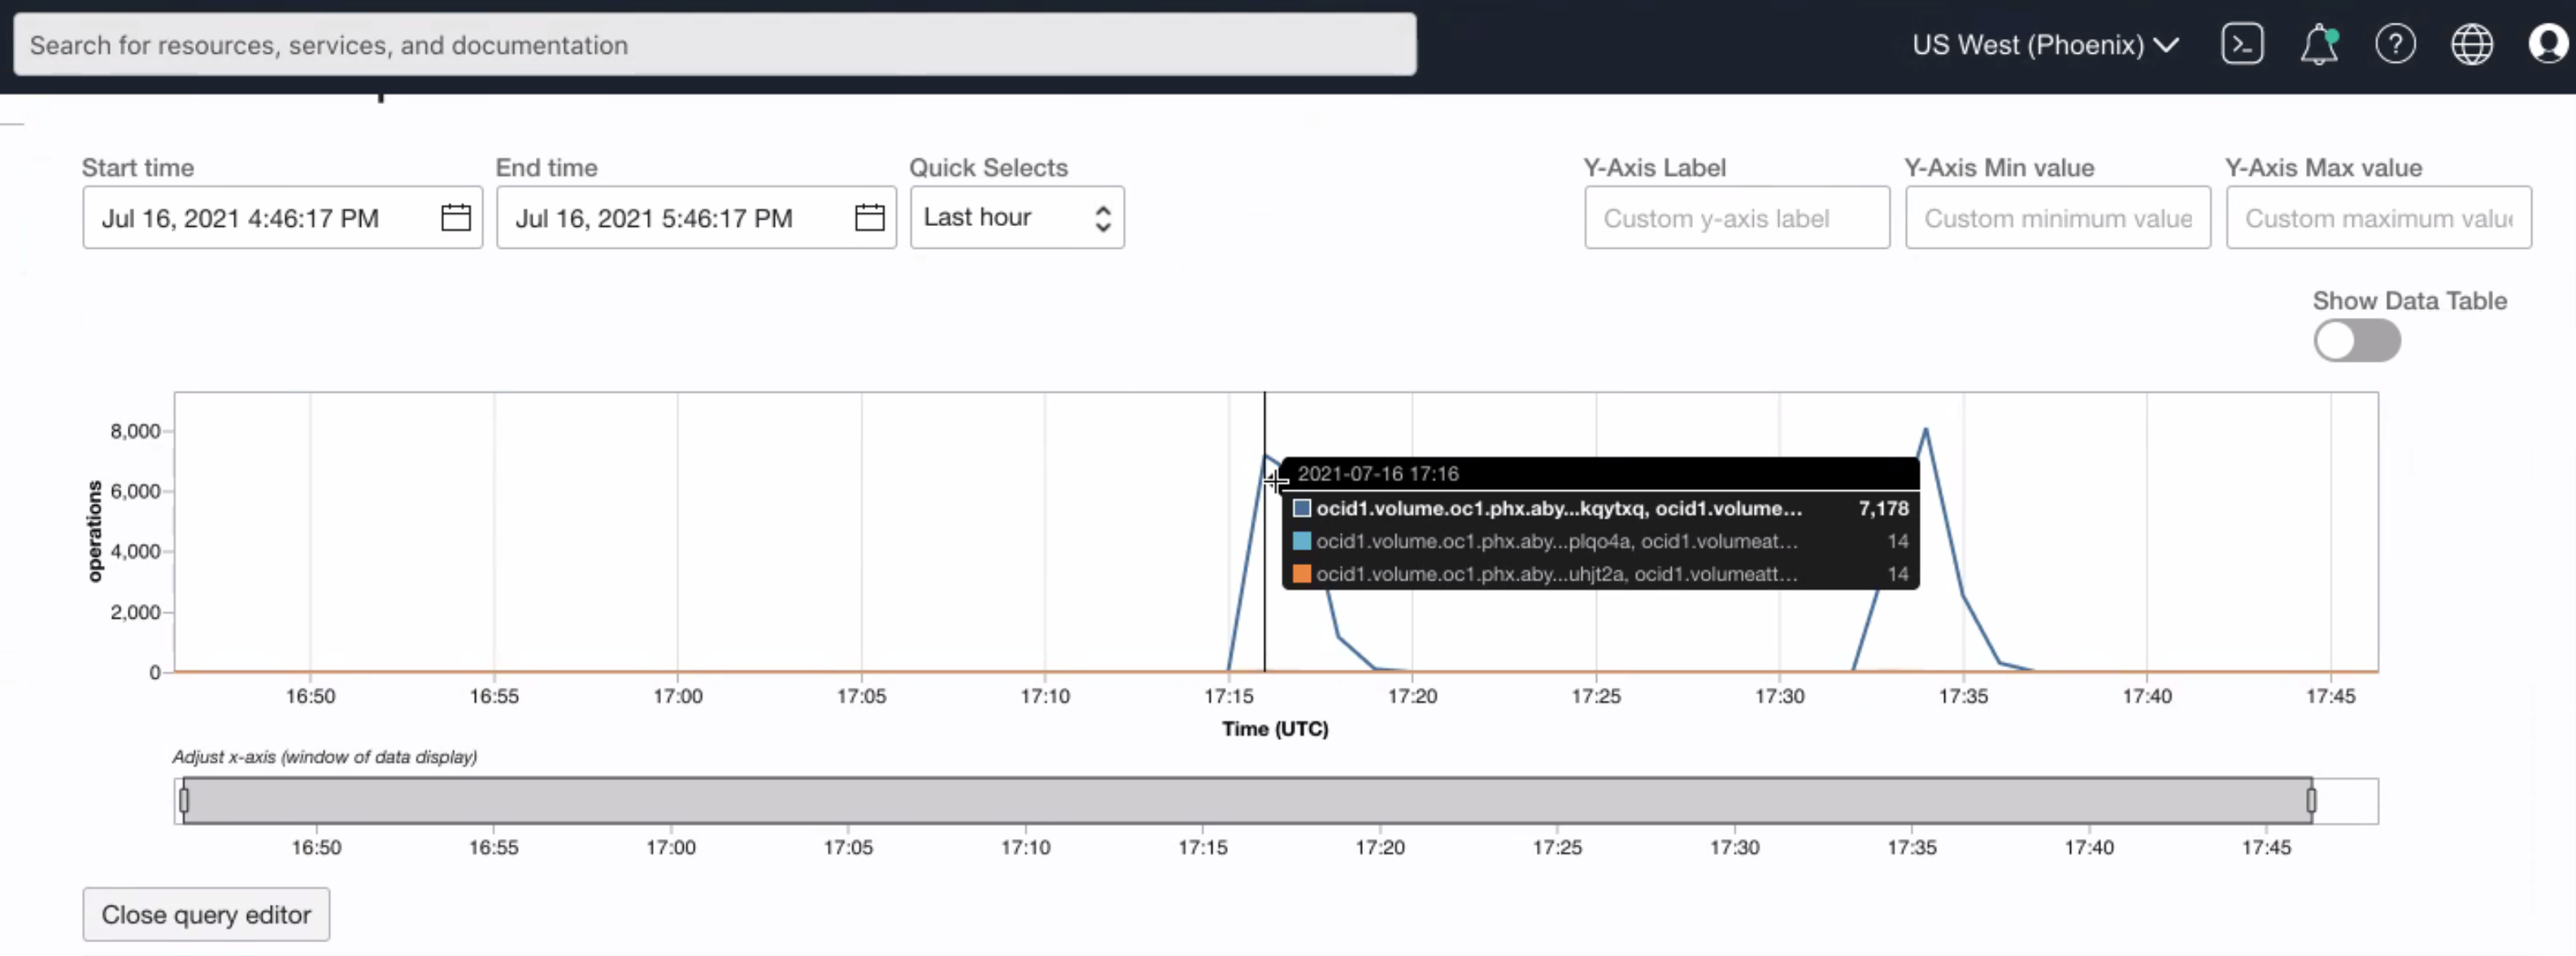
By holding the mouse cursor over the line graph on the time period of increased IOPs, the Block Volume OCID can be determined, and the volume detached.
If the Delphix Engine fails to boot after this process is completed, re-attach the Block Volume and boot the Engine again, and engage Delphix Customer Support for further assistance.
Related Articles
The following articles may provide more information or related information to this article:
- Oracle Cloud Documentation - Volume Metrics
- Delphix Documentation - Storage Migration
- Delphix Documentation - Deployment for OCI