Managing Public Key Infrastructure for use with Masking SFTP Connectors (KBA1850)
KBA
KBA#1850
Issue
This KB article will inform you how to manage PKI for use with SFTP connectors.
Prerequisites
You need to be able to generate an ssh key pair using something like ssh-keygen. This article will use ssh-keygen on a linux host as the example method of creating the key pair.
Applicable Delphix Versions
This article applies to the following versions of the Delphix Engine:
|
Major Release |
All Sub Releases |
| 5.3 | 5.3.0.0, 5.3.1.0, 5.3.2.0, 5.3.3.0, 5.3.4.0, + |
| 5.2 | 5.2.2.0, 5.2.2.1, 5.2.3.0, 5.2.4.0, 5.2.5.0, 5.2.5.1, 5.2.6.0, 5.2.6.1 |
Resolution
Step 1 - Generate a key pair
You must first generate an SSH key pair on a host of your choice. It is often easiest to use the target host where you will be masking since it is running SFTP which suggests the typical SSH suite of products is installed. It is also ideal since one of the keys will have to be installed there to allow access via public key.
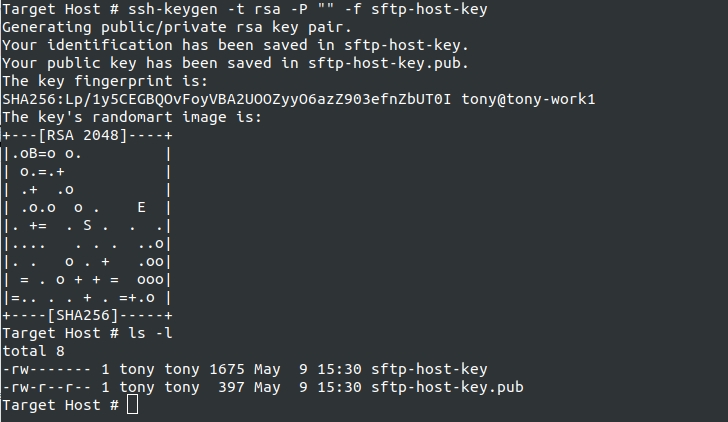
You run ssh-keygen to generate the key. This will produce 2 files. <key> and <key>.pub. You can call the key anything you like, however, please remember, whatever the filename of the private key when you upload to the Masking Service will be the name of the key in the UI for later use. I would suggest giving careful thought to the name you give the key, at least at upload time. In this example, I used the name "sftp-host-key". Such a name might be good if you only ever intend to use 1 key. Or it might be bad if you have many keys for different hosts. If you choose to do the latter, you might want to incorporate the remote host name into the key name to make it easier to manage later.
In this example, I use options to choose an RSA key (-t rsa), to force an empty passphrase (-P ""), and to name the key pair (-f sftp-host-key).
Step 2 - Install the public key on the SFTP target host
On the host that will hold the files to be masked, we need to install the public key so that ssh will use it for authentication. On a unix-based OS that means putting the public key into the authorized_keys file. In our example, I suggested generating the key pair on the target host itself. If you did not do that, you will need to find a way to transfer the public key to the proper account on the target host.
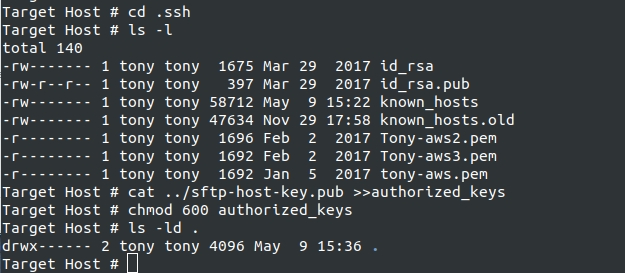
Once you have the public key on the target host, you will need to install it in the proper location. SSH typically uses a directory in the account homedir. This directory is typically called ".ssh". If ssh has never been used by this account, the .ssh directory will not exist. You will need to create it. You can do this via "mkdir .ssh" while in the login account's home directory. SSH will only accept ssh keys under certain circumstances. One of those is that the .ssh directory must be mode 700. Whether the .ssh directory already existed or you had to create it, we now want to change directory to .ssh. After we are in the .ssh directory, we want to append the public key to the "authorized_keys" file. This file may or may not exist already. If you manually created the dir, it will definitely not exist yet. Even if the directory already existed, the file may not be there. It is only created if someone is adding keys to the account for authentication. If that has never been done to this account, the file will not exist. In either case, we can use a single command that will append the public key to the end of the "authorized_keys" file, creating it if necessary. This example command assumes you are in the .ssh directory and the public key is located in the home directory.
cat ../sftp-host-key.pub >>authorized_keys
You can also use you favorite editor and copy the key data out of the public key and paste the key data to the end of the authorized keys file. Another SSH restriction is that the authorized keys file can only be read or written by the owner. So the file must be mode 600. You should double-check the mode of the authorized keys file and "chmod 600 authorized_keys" if the mode is incorrect. Once done, the target host is configured for public key access.
Step 3 - Upload the private key to the Masking Service
Now that we have the public key installed on the target. We need to get the Masking Service configured to use the private key. The first step is to upload the key. Again I want to reinforce that whatever the private key file is called (the filename) at upload time is what the key will be called in the service after upload. So make sure the filename is what you want to see in the UI.
We upload the key via the Masking API Client. For those of you unfamiliar with the API Client, we have docs that discuss it in our masking documentation. The head of the document chain for the API Client is called Masking API Client.
Since we are uploading the private key using a web browser, the private key must be located on the same host that is running the browser. This can be accomplished using a file transfer utility, copy/paste, whatever, so long as a file with the proper name exists somewhere on the desktop / laptop hosting the web browser.
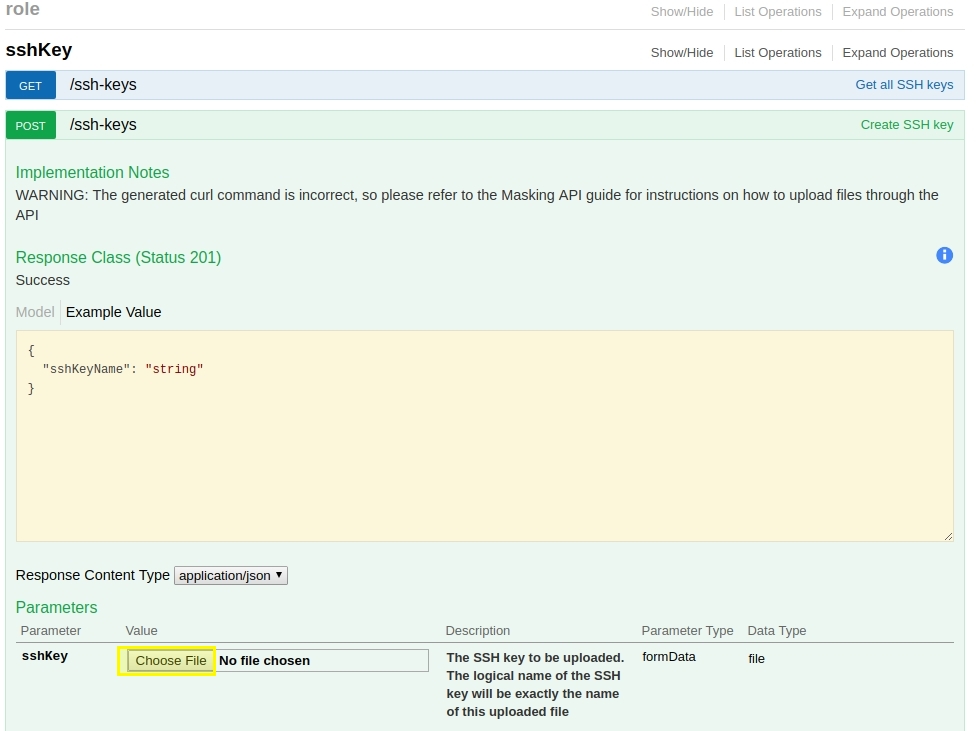
Using the API Client, we will first login and authorize future requests. Then we will use the SSHKey API endpoint to upload the private key. This endpoint is incredibly simple and you only have to click the "Choose File" button under the example and browse to the location of the private key on your local desktop / laptop machine.
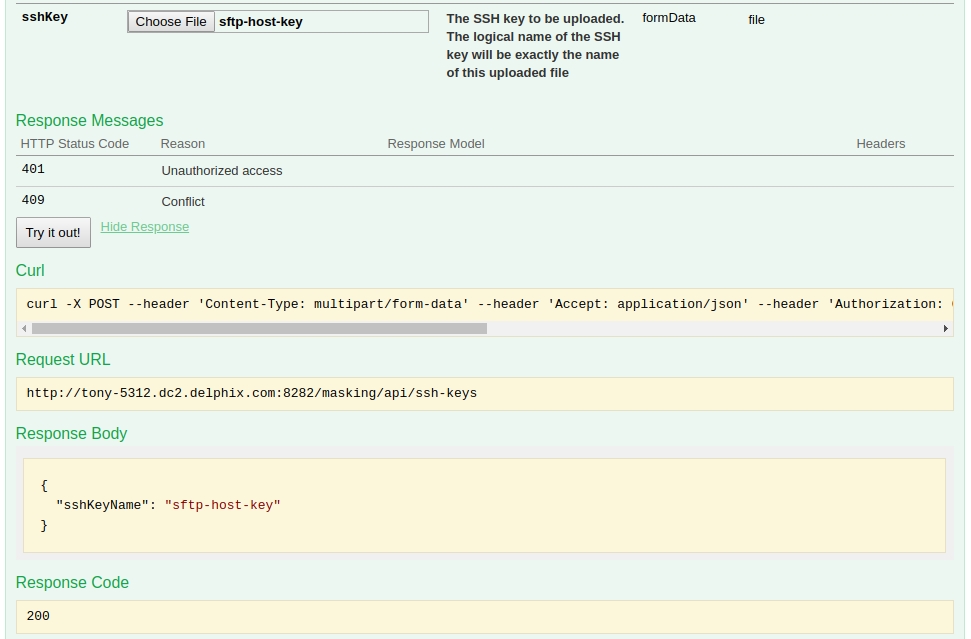
Once the file is selected, you scroll down just a bit to the "Try It Out" button and click that. You should receive Response Code of 200 and a Response body with a JSON struct containing an sshKeyName whose value is the name of the file you uploaded.
Step 4 - Using the uploaded private key to authenticate a connection
After uploading the private key, your Masking Server is configured to have access to that private key. In the example below, I am in the process of configuring an SFTP connector for Delimited File masking. After I select SFTP as the Connection Mode, I gain a checkbox above the connection name called "Public Key Authentication". Checking the box will cause the password field to disappear from the bottom right and a new field called "Available Keys" to appear on the upper right. You can select the drop down and select your uploaded key from the list. One caveat. Currently at least, the list of keys in the drop down is populated at login. If you have an existing window to the Masking server, you will have to logout and login again before you will see your uploaded key.

After completing the remaining configuration of the connector, it will use the uploaded and selected private key to authenticate to the remote SFTP service.
Troubleshooting
At the current time, most of the diagnostic information on the Masking Engine side of the connection will be in the logs. We are working to fix this so that the information is more readily consumed by the end user. However, you can tell a good deal about what is going on with the connection by looking at the sshd logs on the target host. If you report difficulties to our Support group, that is likely to be one of the items you are asked to provide to resolve the problem.